To put a net on a trampoline, start by attaching the net’s straps to the trampoline’s poles. Ensure the net is spread evenly around the perimeter for maximum safety.
Securing a safety net properly on your trampoline is vital for ensuring safe and enjoyable use. Trampoline injuries are no joke, and a well-install net can be a lifesaver, quite literally. Mounting a net involves several key steps: preparing the trampoline frame, laying out the net, and attaching it securely to the poles or enclosure system.
Whether you’re setting up a trampoline for the first time or replacing an old net, understanding the correct process will help reduce the risk of accidents. Clear instructions, a focus on safety, and a bit of patience can make the installation smooth and hassle-free. With these points in mind, let’s dive into the specifics of safely enclosing your trampoline for fun, protected bouncing.

Credit: www.wikihow.com
Introduction To Trampoline Safety
Jumping on a trampoline can be lots of fun! But staying safe always comes first. Using a safety net is key. It helps prevent falls and injuries. Before bouncing away, setting up your trampoline with a net is crucial.
The Importance Of Netting
A safety net is vital for any trampoline. It acts as a barrier. Kids and adults can jump without worry. The net stops jumpers from falling off. This reduces the risk of hurt and ensures everyone can enjoy fun times safely.
Brief On Trampoline Injuries Prevention
To keep jumpers safe, understanding injury prevention is a must. Trampolines without nets lead to more accidents. Here are the top tips:
- Use a net: Always have a safety net in place.
- One at a time: Only one person should jump at a time.
- Rules matter: Set rules for safe use. No flips or rough play.
Now, let’s learn how to easily put a net on a trampoline and keep the fun going!

Credit: www.amazon.com
Choosing The Right Trampoline Net
Jumping on a trampoline provides endless fun, but safety comes first. The right net closes gaps and prevents falls. Understanding what makes a perfect fit is key to your trampoline’s safety upgrade.
Types Of Trampoline Nets
Different trampolines need different nets. They come in various shapes and sizes. Knowing the type you need is crucial. Here’s what you may find:
- Sleeved Nets
- Strap Nets
- Internal Nets
- External Nets
Sleeved nets slide onto poles easily. Strap nets attach with straps, adding flexibility. Internal nets sit inside the spring area for maximum space. External nets cover springs for added protection.
Measuring Your Trampoline For A Net Fit
Finding the right size net requires accurate measurement. Follow these steps:
- Diameter: Measure across the middle, from edge to edge.
- Height: Measure from the jumping surface to the desired net height.
- Poles: Count how many poles or arches support the net.
Remember accuracy ensures a snug, safe net. Round up to the nearest inch. This guarantees the net will not be too tight.
| Measurement Guide | |
|---|---|
| Step | Instructions |
| 1. Diameter | Stretch a tape measure straight across the center. |
| 2. Height | Measure from trampoline bed to an ideal height above the trampoline. |
| 3. Poles | Count poles or arches, and check if they are straight or curved. |
Tools And Materials Needed
Before you start, gather the right tools and materials. Proper preparation makes the job smoother and safer. Here, you’ll find a breakdown of what you need.
Basic Tools For Installation
Trampoline net installation requires a few basic tools. Most homes already have these items.
- Measuring Tape: To measure the frame and ensure the net fits.
- Screwdriver: For securing brackets or clamps.
- Stepladder: To reach the top of the trampoline safely.
Additional Accessories For Setup
Some additional accessories can help with the setup.
| Accessory | Use |
|---|---|
| Spring Tool: | For attaching springs without strain. |
| Gloves: | Protects hands during installation. |
| Net Clips: | Secures net to the trampoline frame. |
With these tools and accessories, you’re ready to start. Follow these steps carefully to ensure a secure net setup.

Credit: www.youtube.com
Step-by-step Installation Process
Ready to enjoy your trampoline with added safety? Follow these simple steps to put the net on your trampoline. We’ll guide you through each stage, making the process straightforward and hassle-free.
Attaching The Poles
- Gather the poles that will hold up the net.
- Position each pole evenly around the trampoline frame.
- Using clamps or provided hardware, secure each pole to the frame.
- Ensure poles are upright and tightly fastened.
Fixing The Net To The Poles
- Lay the safety net on the ground and untangle any knots.
- Locate the top of the net where ties or Velcro straps are located.
- Starting at one pole, connect the net using these ties or straps.
- Continue tying the net to each pole, ensuring it’s evenly distributed.
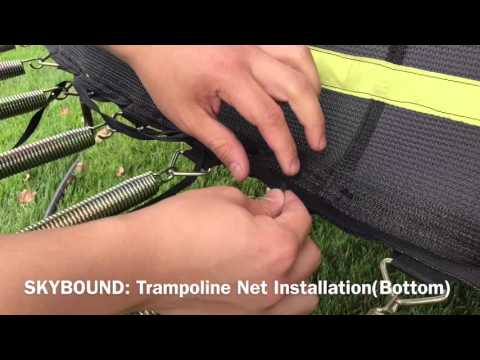
Securing The Net To The Trampoline
It’s time to attach the bottom of the net to the trampoline.
| Step | Action |
|---|---|
| 1 | Find elastic bands or hooks on the net’s bottom edge. |
| 2 | Stretch and hook these bands to the trampoline frame. |
| 3 | Work your way around the trampoline with consistent tension. |
| 4 | Ensure the net is tight and secure without gaps. |
Double-check all connections. Your safety net is now ready!
Safety Checks And Maintenance
After setting up your trampoline with a safety net, regular checks and maintenance are key. These practices ensure your trampoline remains a safe place for fun and exercise. This section dives into what you should look out for and how to keep your equipment in top shape.
Post-installation Checks
Once the net is up, a thorough inspection is crucial. Start from the ground up, ensuring every part of the trampoline is secure.
- Check all the connection points: Make certain the net poles and springs are tightly attached.
- Inspect the net for gaps: There shouldn’t be spaces where someone could slip through.
- Ensure the door closure is secure: The entry to the trampoline needs to be safe.
- Examine the frame padding: Padding must cover springs and frame edges fully.
Routine Maintenance Tips
Good habits can extend the life of your trampoline net and keep it safe. Follow these simple steps regularly:
| Frequency | Action |
|---|---|
| Weekly | Brush off leaves and debris; tighten loose parts. |
| Monthly | Check for tears or snags in the net; oil springs if necessary. |
| Seasonally | Inspect weather damage; clean with mild soap and water. |
| Annually | Assess for wear and tear; consider replacing parts if needed. |
Keep your trampoline free from unnecessary weight when not in use. Remove shoes, toys, and extra objects that stress the net and padding. Well-kept equipment ensures consistent safety and performance for everyone’s enjoyment.
Common Mistakes To Avoid
Setting up a trampoline net seems straightforward, yet simple errors can lead to big problems. Here are key mistakes to sidestep for a safe and fun jumping experience.
Improper Pole Placement
Setting poles correctly is crucial. They must align with designated slots. Avoid forcing poles into spots that look close but don’t fit perfectly. This can cause structural issues and potential injuries.
- Check the manual for specific instructions.
- Each pole should slide in without resistance.
- Use a rubber mallet if necessary for a snug fit.
Remember, poles at wrong angles will compromise the net’s effectiveness.
Incorrect Net Tensioning
A net too loose or too tight won’t protect properly. Follow these steps for perfect tension.
- Attach the net to the poles at the top first.
- Proceed to evenly attach at the bottom.
- Check for slack and readjust as needed.
Ensure the net has no gaps and isn’t overstretched. Both issues can weaken the net over time.
Frequently Asked Questions For How To Put Net On Trampoline Easily!
What Is The Easiest Way To Install A Trampoline Net?
To install a trampoline net easily, first ensure you have all necessary pieces. Lay the net flat, attach the top rings to the poles, and secure the bottom evenly around the trampoline’s edge. Consistency and symmetry are key for a tight fit.
Can You Put A Net On A Trampoline By Yourself?
It’s possible to put a net on a trampoline solo, but it’s easier with help. Start by attaching the top part of the net to the poles. Then, working your way around, secure the bottom. Take your time to adjust the net evenly.
How Long Does It Take To Set Up A Trampoline Safety Net?
Setting up a trampoline safety net can typically take around 30 minutes to an hour. This depends on the trampoline size and if you’re doing it alone or with assistance. Following the manufacturer’s instructions can help speed up the process.
What Tools Are Required To Put Net On A Trampoline?
To put a net on a trampoline, you’ll usually need no tools, as most trampoline nets are designed for easy, tool-free assembly. However, some models may require a screwdriver or Allen key to secure the net poles to the frame.
Conclusion
Wrapping up, fitting a net to your trampoline is a breeze with the proper steps. We’ve guided you through a foolproof method to boost safety and fun. Remember, regular checks for wear and tear can extend your net’s lifespan. Now, enjoy your secure bouncing haven and soar high without worry!